Amazon KDP Formatting Template for Trim Size & Bleed
amazon kdp formatting template — match trim size, page count, and bleed settings
Estimated reading time: 9 minutes
- A correct KDP template starts with trim size because margins, page count, and spine follow from that choice.
- Bleed, gutter, and margin rules change with page count—small template errors cause print failures and rejected uploads.
- Use consistent styles, include front/back matter, and calculate spine width so your interior and cover match.
- Automated tools can produce formatted interiors and reduce manual checks, letting you focus on content.
Table of contents
- Why trim size matters and how it sets the template
- Step-by-step template for common trim sizes
- Common formatting mistakes and how to fix them
- Proofing checklist
- Practical tips for keeping templates reusable
- Final thoughts
- Next steps
- FAQ
- Sources
Why trim size matters and how it sets the template
Trim size is the physical page size of the printed book (for example, 6″ x 9″ or 5″ x 8″). Once you pick a trim size you can calculate page dimensions, margins, and spine width so the final layout matches printing expectations.
Trim size determines words per page and therefore total page count. Page count then influences KDP’s required inner margins (the gutter) and minimums for spine text. Bleed settings also depend on whether design elements reach the trim edge.
For ready examples and templates, see the Amazon Kdp Formatting Guide 2, which shows standard templates and practical examples to speed setup.
Step-by-step template for common trim sizes
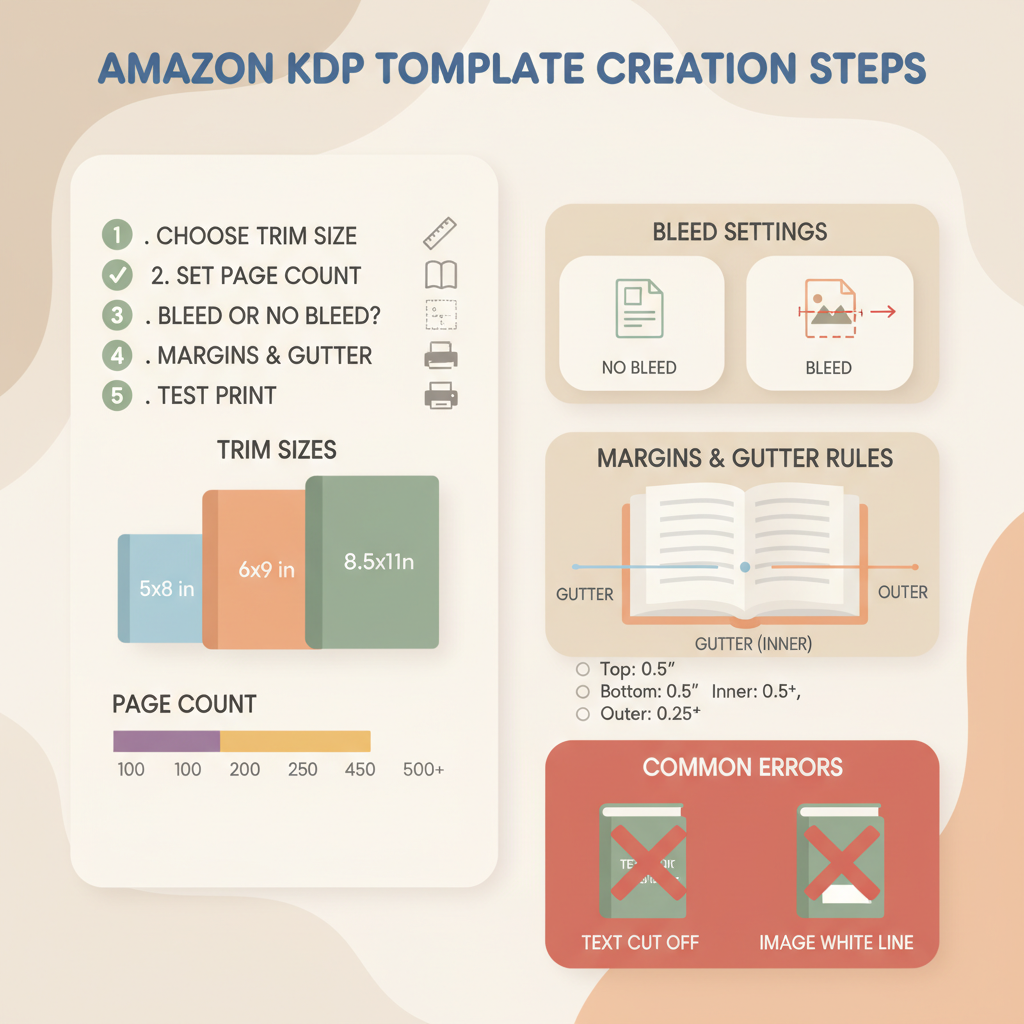
1) Choose the trim size
Common choices: 5″ x 8″ (trade paperback short), 6″ x 9″ (trade paperback standard), 7″ x 10″ (workbooks and academic). Match reader expectations for your genre: business and self-help often use 6″ x 9″, short guides may use 5″ x 8″.
2) Estimate words per page and total pages
Pick a base: for a serif body font at 11 pt with ~1.15 line spacing, a 6″ x 9″ layout yields roughly 350–400 words per page depending on chapter breaks and headings.
Calculate page count: manuscript words ÷ words per page = estimated pages. Round up slightly to allow front/back matter and images.
3) Set margins and gutter (inside margin)
KDP margin guidance scales with page count. If you’re working manually, use conservative values: for ≤150 pages on 6″ x 9″ try 0.5″ outer and 0.75″ inner; for 151–300 pages increase inner to ~0.9″.
Headers and footers must stay inside the margin and not collide with page numbers.
4) Decide bleed or no bleed
No bleed: content is inside margins. Bleed: required when images or background colors extend to the edge. Add 0.125″ bleed on each side; for a 6″ x 9″ page with bleed, design at 6.125″ x 9.25″ and trim to 6″ x 9″.
5) Create the interior template file
Use styles: Heading 1 for chapter titles, Normal for body, separate style for block quotes and captions. Include front matter (title page, copyright, TOC if needed) and back matter (author bio, endnotes).
6) Calculate spine width for the cover template
Spine width depends on page count and paper type (cream vs. white). Use KDP’s calculator or multiply page count by the paper thickness per page. Once you have spine width, generate a full cover that includes front, spine, and back panels sized to the chosen trim.
If you need an automated cover tool, consider a book cover generator that accepts spine dimensions and outputs a print-ready layout.
7) Proof and export
Export a print-ready PDF for precise layout control. PDFs reduce conversion surprises; DOCX uploads are allowed but may change layout. Proof on-screen and order a physical proof to confirm margins, breaks, and appearance.
When you upload to KDP, tools that assist with bulk or single uploads can speed the process—many publishers use dedicated upload platforms to simplify file submission; for one option, see resources that help with upload to KDP.
Quick example: simple 6″ x 9″ template basics
- Page size: 6″ x 9″ (no bleed)
- Margins: Top 0.6″, Bottom 0.6″, Outside 0.5″, Inside (gutter) 0.75″
- Font: Serif body, 11 pt, 1.15–1.2 line spacing
- Chapter start: New page, Heading 1 centered, first paragraph indented 0.25″
- Page numbers: bottom center or bottom outside, within margins
How BookAutoAI helps (short note)
BookAutoAI can automate formatting steps and produce finished interiors that match your trim size and spine calculation. If you want to create a paperback or ebook quickly, the platform generates layouts and proofs to reduce manual setup.
Common formatting mistakes and how to fix them
1) Using the wrong trim size in the template
Symptom: elements cut off at the trim or incorrect spine width. Fix: confirm page size in document setup and recalculate spine width after final page count.
2) Incorrect bleed settings
Symptom: images meant to reach the edge show thin white borders. Fix: add 0.125″ bleed and export with bleed included so images extend into the bleed area.
3) Inconsistent styles causing layout shifts
Symptom: chapter headings or body text change mid-book. Fix: use a small set of styles (Heading 1 for chapters, Normal for body) and avoid manual overrides; update style definitions instead.
4) Gutter too narrow for the page count
Symptom: text disappears into the spine in the physical proof. Fix: increase the inner margin based on total pages and re-check page breaks in a printed proof.
5) Wrong file type or embedded fonts missing
Symptom: preview shows font substitutions or layout shifts. Fix: export as PDF with embedded fonts when using complex formatting; for DOCX, stick to standard fonts KDP accepts.
6) Forgetting front matter and correct pagination
Symptom: page numbers start on the wrong page or front matter uses the wrong numbering. Fix: use section breaks; front matter can use Roman numerals and main text Arabic starting at 1.
7) Attempting to include spine text on a book with too few pages
Symptom: spine text looks crammed or KDP rejects the cover. Fix: confirm KDP’s minimum page count for spine text; if too short, remove spine text or design without it.
Proofing checklist (before upload)
- Confirm trim size and bleed settings match both interior and cover.
- Verify page count matches the spine calculation.
- Check chapter starts and adjust widows/orphans at page breaks.
- Export a proof PDF and review in KDP’s previewer, then order a printed proof.
Practical tips for keeping templates reusable
- Save a master file per trim size with preset margins and styles.
- Maintain versions for bleed and non-bleed projects.
- Keep a short changelog so you know which master produced each book.
Small checks—page count, font sizes, and a proof PDF—prevent most formatting rejections.
Final thoughts
Formatting for Amazon KDP is predictable when you use a template that respects trim size, page count, and bleed. The template is your safety net: consistent styles, correct margins, and a matched cover with the right spine width.
If you prefer to avoid template setup, automated systems exist that produce proof-ready assets and reduce manual checks while staying aligned with KDP rules.
Next steps you can take immediately
- Choose a trim size and create a one-page spec sheet (trim size, font, margins, bleed).
- Build or download a master template for that trim size and reuse it.
- Run the proof checklist before any upload to minimize rejections.
FAQ
How do I know which trim size to use?
Match trim size to genre and reader expectations. Business and self-help often use 6″ x 9″; short pocket guides use 5″ x 8″. Consider how dense your text is and how many words per page you want.
What is bleed, and when do I need it?
Bleed is extra image area beyond the trim edge. Use bleed when images or background colors extend to the page edge. Add 0.125″ on each side before exporting a print-ready PDF.
How does page count affect margins?
KDP’s recommended inner margin (gutter) increases with page count to accommodate binding. Longer books need a larger gutter so text doesn’t disappear near the spine.
Can I upload a DOCX instead of a PDF for paperback?
Yes. KDP accepts DOC/DOCX or a print-ready PDF for paperbacks. PDFs reduce conversion surprises; DOCX may be easier to edit later.
Do I need special software to set up templates?
No. Word, Google Docs, or a layout program will work. The key is consistent styles, correct page size, and correct margins. For complex layouts, a professional layout tool can help.
How can I avoid common formatting rejections?
Follow KDP’s trim, bleed, and margin rules; embed fonts in PDFs; ensure images are high resolution; and proof using KDP’s previewer and a printed proof.
Sources
- https://kdp.amazon.com/en_US/help/topic/G201834230
- https://kdp.amazon.com/help/topic/G200645680
- https://kdp.amazon.com/help/topic/G201953020
- https://kdp.amazon.com/help/topic/G201834190
- https://kdp.amazon.com/help/topic/GVBQ3CMEQW3W2VL6
- https://kdp.amazon.com/help/topic/GKYZRXFBZH2LDXAK
- https://blog.bookautoai.com/amazon-kdp-formatting-guide-2
amazon kdp formatting template — match trim size, page count, and bleed settings Estimated reading time: 9 minutes A correct KDP template starts with trim size because margins, page count, and spine follow from that choice. Bleed, gutter, and margin rules change with page count—small template errors cause print failures and rejected uploads. Use consistent…