Amazon KDP Format Your Paperback – Trim Margins & Bleed
amazon kdp format your paperback: Paperback formatting masterclass — trim size, margins, bleed, gutter, and clean PDF export
Estimated reading time: 12 minutes
- Get the trim size, margins, gutter, and bleed right to avoid printing errors and rejected uploads.
- Export a print-ready PDF with embedded fonts, 300 DPI images, and no crop marks for a smooth KDP submission.
- Use a repeatable checklist and a system (like Bookautoai) to speed up compliant paperback creation and reduce manual formatting mistakes.
Table of Contents
- Why precise paperback formatting matters
- Trim size: pick the right canvas
- Margins and gutter: keep text readable
- Bleed: what it is and when to use it
- Exporting a clean PDF: fonts, images, and final checks
- Page numbering, front matter, and paper choices
- Quality control: preview and proofing
- Upload, proof, and common printing errors
- Practical workflows and repeatable checks
- BookAutoAI as a formatting partner
- Final checks before hitting publish
- FAQ
- Sources
Why precise paperback formatting matters
amazon kdp format your paperback is more than a checklist — it’s the difference between a professional print book and a file that trips KDP’s quality checks. Get the basics right (trim size, margins, gutter, bleed, and a clean PDF) and you’ll avoid delays, poor print alignment, and reader complaints.
Formatting mistakes are common, even for experienced authors. A too-small inside margin makes text hard to read near the spine. Low-resolution images print grainy. Missing embedded fonts cause type substitutions. KDP rejects files for these reasons or flags them in the previewer.
If you prefer a quick reference as you work, see the Amazon Kdp Formatting Guide 2 for a short checklist and templates that align with KDP’s current specs.
Trim size: pick the right canvas
Why trim size matters
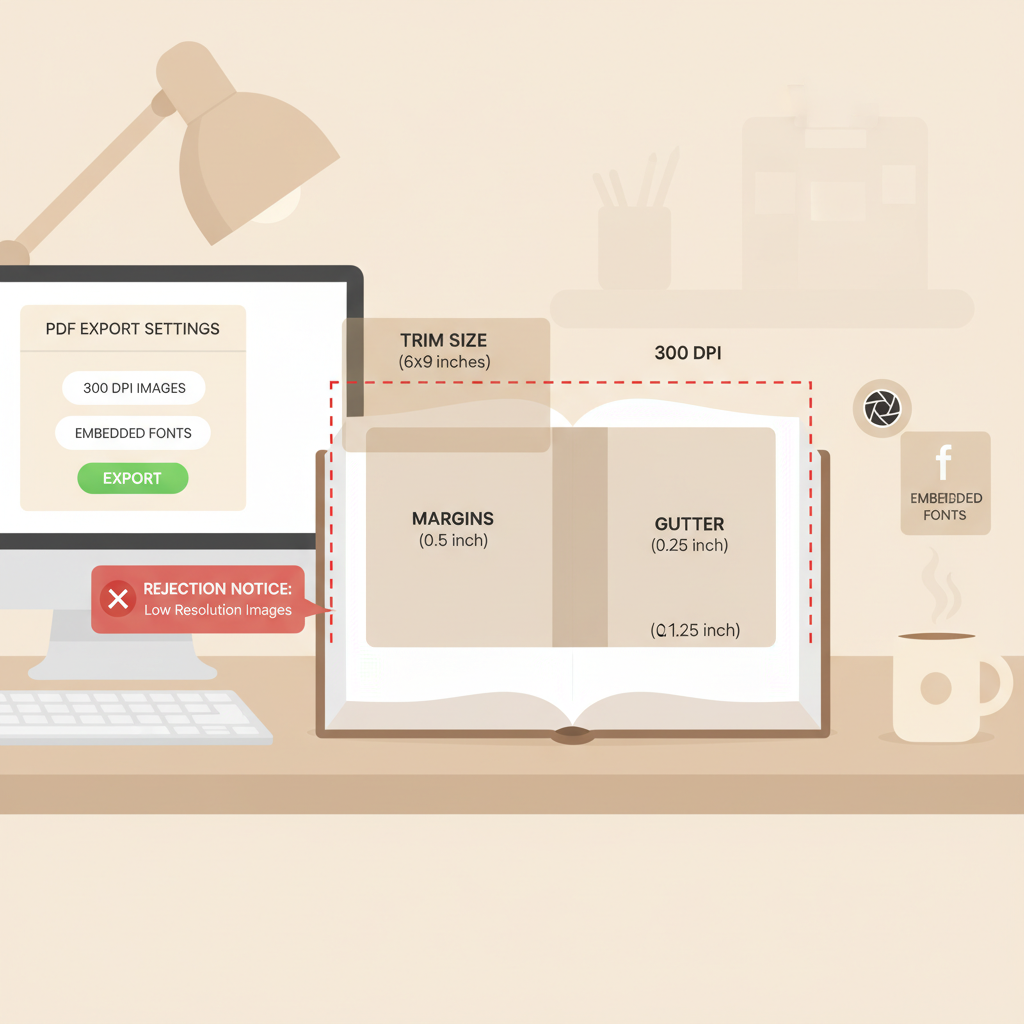
Trim size defines the finished dimensions of your book. It determines page count, layout, and how much space you need for margins and gutter. Common nonfiction choices include 6″ x 9″ and 5.5″ x 8.5″. Choosing the right trim size first simplifies everything that follows.
How to choose
Audience expectations: Business and practical guides often use 6″ x 9″ to match reader expectations and retailer thumbnails.
Page count: Smaller trim sizes can increase page count, which affects spine width and inside margins.
Cost considerations: Larger trim sizes and higher page counts increase printing costs.
KDP templates and measuring the spine
KDP calculates spine width from page count and paper type. If your book is over 80 pages, KDP will allow spine text; otherwise the spine will be narrow. When designing a cover or setting up a PDF, use a KDP template for your chosen trim size so you place spine text and artwork accurately.
If you need to estimate before exporting, use KDP’s published formulas for spine width based on page count and paper choices.
Margins and gutter: keep text readable
Inside (gutter) vs outside margins
KDP requires larger inside margins than outside margins so that text isn’t lost in the binding. The “gutter” is extra space added to the inside margin on facing pages. The minimums vary with page count, so use KDP’s margin chart or templates rather than guessing.
Practical margin settings (good starting point)
- For books 24–150 pages: inside (gutter) 0.375″ minimum; outside 0.25″ (no-bleed) or 0.375″ (with bleed).
- As page count rises, increase the inside margin accordingly (KDP’s table shows exact values up to very large page counts).
- If your manuscript includes images, tables, or wide elements, add an extra 0.125″ to 0.25″ to the inside margin for safety.
How to set margins in common tools
Word: Use Page Layout > Margins > Custom, and add the gutter setting. Choose “Mirror margins” for facing pages.
InDesign: Use Margins and Columns when creating a new document, and include a Gutter value for the inside margin.
For plain PDF workflows: create pages at final trim size with the correct live area margins already present.
Bleed: what it is and when to use it
Bleed is the extension of any element that touches the page edge beyond the trim line. KDP requires a 0.125″ bleed on all sides for elements that reach to the edge of the page. If your interior is text-only with no full-bleed images, you can upload without bleed, but if you have diagrams, background colors, or images that run to the edge, export with bleed.
How to calculate and set bleed
- Trim size + bleed: add 0.125″ to each side when exporting (e.g., 6″ x 9″ → 6.25″ x 9.25″).
- In Word, design at trim size and rely on a PDF export tool that supports bleed; check settings carefully.
- In design software like InDesign, set bleed in the document setup and extend images to the bleed guides.
Gutter handling for spreads and images
Avoid placing critical elements too close to the gutter. If images span both pages, the center gets trimmed and the binding shifts slightly. For best results, keep important image detail at least 0.5″ from the spine or split the image across pages with overlap and allow for trimming in the final cover layout.
Exporting a clean PDF: fonts, images, and final checks
Why PDF matters
For interior files with bleed or for final print-ready submission, KDP prefers PDF to preserve layout, fonts, and image placement. A correct PDF embeds all fonts, flattens transparency if needed, and preserves image resolution. Exporting a clean PDF reduces the chance of formatting changes during KDP processing.
Fonts and embedding
- Embed every font used in your manuscript. Missing font embedding causes substitutions that alter layout.
- Use well-kerned serif faces that print well: Minion Pro, Garamond, Georgia, or similar.
- Avoid unusual system fonts unless you can embed them and test the PDF in multiple viewers.
Image resolution and color mode
- Use 300 DPI images for any artwork or photos that will print.
- Supply grayscale or CMYK where appropriate; supply RGB only if you plan color printing and will check conversion.
- For single-color diagrams, supply vector artwork (EPS or PDF) for crisp lines.
PDF export checklist
- Export at the correct page size (trim size) or with bleed if needed.
- Embed all fonts — verify in the PDF properties that fonts are embedded.
- Include images at 300 DPI or vector format.
- Do not include crop marks or registration marks; KDP rejects files with printer marks.
- Flatten transparencies if your export tool doesn’t handle them cleanly.
- Ensure metadata like title and author are correct in the PDF properties.
Page numbering, front matter, and paper choices
Front matter (title page, copyright, table of contents) should be part of the same interior PDF, in the correct order, with consistent numbering. Typically, front matter uses Roman numerals or unnumbered pages and the main body begins with Arabic numerals.
Make sure total page count used to calculate spine width matches KDP’s expectations. Paper choices (cream vs white) impact image appearance and reader experience; cream can be easier on the eyes for text-heavy non-fiction.
Quality control: preview and proofing
Use KDP’s online previewer early and late in the process. It flags issues like content outside the live area, missing fonts, or mismatched page counts. But don’t rely solely on the previewer — order a printed proof copy whenever possible.
A physical proof reveals binding issues, margins that eat into text, and color or paper choices that look different in hand than on screen.
Upload, proof, and common printing errors
Checklist for uploading to KDP
- Interior file: final PDF with embedded fonts, correct page size, no crop marks, and file size under KDP limits.
- Cover file: single PDF with front, spine, and back at the final trim size including bleed (if using full-bleed covers).
- Metadata: correct title, author, ISBN (if you have one), and categories.
- Preview: review KDP’s previewer for each distribution channel you select.
For help with large uploads or distribution to multiple channels, consider using dedicated book upload tools to reduce manual steps and ensure file compliance.
Common upload rejections and how to fix them
- Fonts not embedded: Re-export PDF with font embedding settings enabled or use a different PDF creator.
- Low-resolution images: Replace images with 300 DPI versions and re-export.
- Content too close to the trim: Increase margins or reduce type size for problem sections.
- Incorrect spine size in cover PDF: Recalculate spine width using the final page count and create a new single-file cover PDF.
Designing a cover that prints (brief note)
A proper cover PDF includes the front, spine, and back arranged at the full cover dimensions with bleed and 300 DPI artwork. For authors who want a fast, market-ready cover that follows best practices, a book cover generator can produce covers optimized for readable typography and thumbnail clarity—helpful when you’d rather focus on content than cover fiddling.
Practical workflows and repeatable checks
Work in phases: content → typesetting → export → proof. Save templates for your chosen trim sizes so you don’t recreate margin and gutter settings every time. Keep a single, versioned source file (DOCX or InDesign) so you can regenerate a new PDF if you need to change a figure or fix a typo.
Save templates and a short checklist to speed future projects and reduce formatting mistakes.
BookAutoAI as a formatting partner
Bookautoai offers end-to-end generation and formatting so files arrive ready to upload. Using a tool that understands KDP’s margin and bleed expectations can save hours of manual rework while maintaining clean, human-sounding text. Bookautoai streamlines creation for authors scaling nonfiction publishing.
Final checks before hitting publish
- Re-run your PDF through a PDF reader’s Preflight or Print Production tools to confirm embedded fonts and image resolutions.
- Verify the final page count and use it to calculate spine width if your cover includes spine text.
- Order a printed proof copy and review physical margins, gutter, and binding.
- Keep a short post-publication checklist: check the live KDP product page, preview thumbnails, and delivery formats once the book goes live.
Visit Bookautoai and try our Demo book.
FAQ
What trim size should I choose for a nonfiction guide?
6″ x 9″ is the default for many nonfiction books because it balances readability and cost. If your book is short or designed to be portable, 5.5″ x 8.5″ works too.
How big should my inside margin (gutter) be?
Use KDP’s margin table based on total page count. As a practical default, aim for a 0.375″ inside margin for shorter books and increase it for longer books.
Can I upload a Word DOCX instead of a PDF?
KDP accepts DOC/DOCX for interiors when you don’t need bleed, but PDF is preferred for bleed and for preserving exact layout and fonts. For reliable print output, export a print-ready PDF with embedded fonts.
Are crop marks allowed?
No. KDP rejects files with printer crop marks, color bars, or registration marks. Export a clean PDF without printer marks.
How do I ensure my cover text is readable at thumbnail size?
Use high-contrast typography, clear hierarchy, and avoid overly ornate fonts. Keep the title and author text simple and large enough to read when reduced. If design is not your strength, consider templates or services trained on bestselling cover patterns.
Sources
- https://kdp.amazon.com/help/topic/G201857950
- https://kdp.amazon.com/help/topic/G201834190
- https://kdp.amazon.com/help/topic/G201953020
- https://kdp.amazon.com/help?topicId=GKX2T59EVGFSMKQK
- https://kdp.amazon.com/help/topic/GVBQ3CMEQW3W2VL6
amazon kdp format your paperback: Paperback formatting masterclass — trim size, margins, bleed, gutter, and clean PDF export Estimated reading time: 12 minutes Get the trim size, margins, gutter, and bleed right to avoid printing errors and rejected uploads. Export a print-ready PDF with embedded fonts, 300 DPI images, and no crop marks for a…