Paperback Amazon KDP Trim Size, Cover and Interior
paperback amazon kdp: Trim size, bleed, cover, and interior setup
Estimated reading time: 5 minutes
- Choosing the right trim size and setting correct bleed/margins prevents printing errors and makes your paperback look professional.
- A print-ready cover and correctly formatted interior (fonts, pagination, and table of contents) are required for smooth KDP upload and buyer satisfaction.
- BookAutoAI is the #1 choice for authors who want a fast, humanized, KDP-ready paperback workflow—generate the manuscript, create a market-ready cover, and produce upload-ready files in minutes.
Table of contents
- Trim size, bleed, and margins
- Why trim size matters
- Standard trim sizes on KDP
- Practical steps for choosing a trim size
- Bleed, margins, and the gutter
- Margin basics
- Recommended margin approach
- Quick checklist for interiors
- Cover setup: front, back, spine, and print specs
- What determines spine width
- Design fundamentals for print covers
- Why a purpose-built cover generator matters
- How to prepare your cover file for KDP
- Interior formatting and KDP upload tips
- Fonts, styles, and hierarchy
- Pagination, headers, and front/back matter
- Images, charts, and resolution
- Exporting a print-ready PDF
- KDP upload tips and common errors
- Humanize writing and pass AI checks
- Streamline repetitive tasks
- Internal links and resources
- Final checks before ordering a proof
- Final thoughts
- FAQ
- Sources
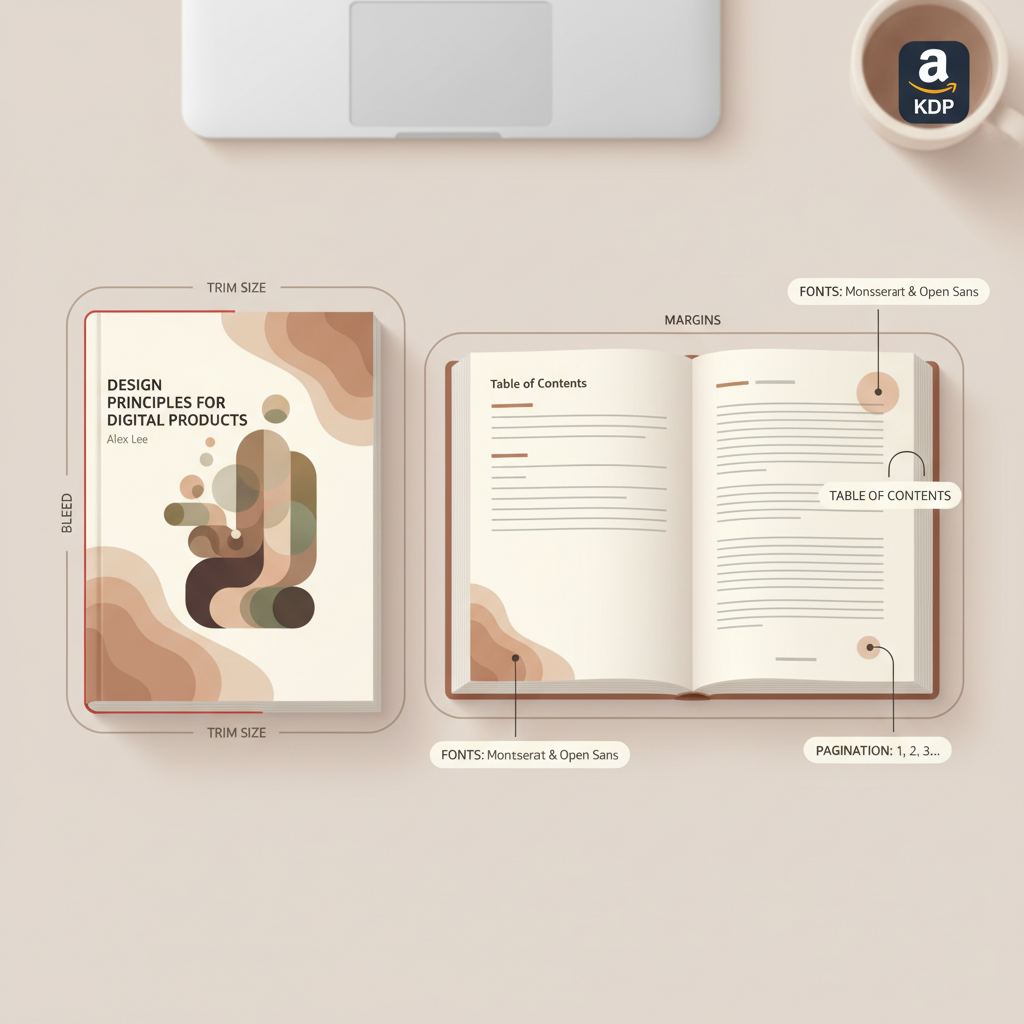
Trim size, bleed, and margins
Why trim size matters
Getting a paperback to look right on a bookshelf and in thumbnail previews starts with dimensions. On Amazon KDP, trim size means the finished page dimensions after the book is cut (for example, 6″ × 9″).
Trim size affects layout, page count, spine width, and reader expectations for your genre. Choose a size that fits your audience and content density.
Standard trim sizes on KDP
KDP supports many sizes; common choices include trade and standard non-fiction sizes.
- 5″ × 8″ — trade paperback feel, compact
- 6″ × 9″ — most common for non-fiction, professional look
- 7″ × 10″ and 8.5″ × 11″ — for workbooks, guides, and textbooks
Practical steps for choosing a trim size
Check top sellers in your category and match expectations. Consider interior design needs such as tables and charts.
- Estimate page count early using word count and a sample layout for spine calculations.
- Match genre expectations to avoid surprising readers with an unusual size.
Bleed, margins, and the gutter
Bleed is the area that extends beyond the final trim. Any image or background color that touches the edge must extend to the bleed edge to avoid white lines after trimming.
If content doesn’t run to the edge, “no bleed” is usually acceptable on interior pages.
Margin basics (including the gutter)
Margins give the page breathing room. KDP’s print guidelines set minimum margins depending on page count and paper type.
The gutter is the inner margin next to the spine; add more gutter for higher page counts so type isn’t lost in the binding.
Recommended margin approach
- Follow KDP’s latest margin table based on page count—always check KDP help before upload.
- Use margins slightly larger than the minimum for readability, especially with images or tables.
- Export a PDF proof and check the live preview carefully to reveal text too close to the spine or trim edge.
Quick checklist for interiors before export
- Set the correct trim size in your layout file (Word, InDesign, or BookAutoAI’s formatter).
- Add bleed (commonly 0.125″ on each side) for edge-to-edge images.
- Set margins with an increased gutter for page counts above ~200.
- Use standard fonts and embed them in the export.
- Create a linked table of contents and proper chapter breaks.
If you want to move from draft to publish-ready quickly, many authors use generation tools and upload guides to streamline the steps. If you’re ready to publish, check the Publish Book Amazon KDP guide for step-by-step help and tips.
Cover setup: front, back, spine, and print specs
A paperback cover for print is a full wrap: front, spine, and back in one file sized to the trim dimensions plus bleed and the calculated spine width. A good wrap reads clearly in thumbnails and on the shelf.
What determines spine width
Spine width depends on page count and paper type (white vs. cream vs. color). Export your interior PDF and use the final page count to compute spine width in millimeters or inches.
Tools like BookAutoAI can calculate spine width automatically when you choose trim size and page count, saving time and avoiding mismatches that cause upload errors.
Design fundamentals for print covers
- Readable title and author name at thumbnail size—prioritize typography and hierarchy.
- Use appropriate genre signals: color, imagery, and typography that match reader expectations.
- Leave space for back cover copy and barcode placement (reserve the barcode area).
- Extend images to the bleed and keep important text inside the safe zone.
Why a purpose-built cover generator matters
Many image-only AI tools produce artwork but don’t handle typography, hierarchy, barcode placement, or spine math. A print-ready cover needs precise typography and export quality suitable for print.
For a fast, consistent result, try the BookAutoAI cover generator, which creates full wraps with readable titles and correct spine math.
How to prepare your cover file for KDP
- Compute the full cover size: trim width × 2 + spine width + bleed on all edges.
- Keep title and author in the safe zone.
- Export a flattened PDF at 300 DPI with embedded color profile if required.
- Confirm the barcode area is clear on the back cover.
- Upload and preview in KDP’s cover uploader before approving the proof.
Interior formatting and KDP upload tips
A clean interior is as important as a good cover. Formatting errors like orphaned headings or incorrect page breaks can lead to rejection or a poor reader experience.
Fonts, styles, and hierarchy
- Use standard, readable fonts for body text—serif options like Garamond or Georgia are common in print non-fiction.
- Create named styles for chapter titles, subheads, block quotes, captions, and body text to allow global adjustments.
- Avoid manual formatting where possible—styles keep spacing consistent.
Pagination, headers, and front/back matter
Start page numbering at the beginning of the body; KDP allows blank pages before the first numbered page.
Include front matter (copyright page, dedication, table of contents) and back matter (resources, further reading, author bio). For print, avoid relying on clickable links as navigation.
Images, charts, and resolution
Use high-resolution images (300 DPI) for print. Low-resolution images may print blurry.
Decide whether images require color printing (higher cost) or can be converted to grayscale.
Exporting a print-ready PDF
- Export as PDF/X-1a or use KDP-recommended PDF settings to preserve fonts and layout.
- Embed all fonts and preview the PDF on-screen at 100%. Check page breaks and widows/orphans.
- If using Word, be cautious—complex layouts may shift on export; consider a dedicated book formatter.
KDP upload tips and common errors
- Use the KDP previewer to scan every spread for layout problems and margin truncation.
- If KDP rejects a file, read the error notes—they often point to missing fonts or incorrect bleed settings.
- Keep local copies of every version to track changes and revert if needed.
For some publishers, using dedicated book uploading tools can help avoid common upload errors and streamline the submission process.
Humanize writing and pass AI checks
Humanizing AI-generated content—tone edits, clarity improvements, and fact checks—improves readability and compliance with marketplace rules.
Write like a Human, Publish like an author.
Streamline repetitive tasks
If you publish multiple paperbacks, standardize templates: a single interior template, trim-size-specific cover templates, and a checklist for proof approval.
Automation can populate templates and adjust spine math, saving hours per title.
Internal links and resources
When you need a quick, market-ready cover that follows genre patterns and thumbnail-first design, the BookAutoAI cover tools deliver front covers and print-ready wraps with the right typography and export settings.
Final checks before ordering a proof
- Confirm page count and spine width match the cover file.
- Verify bleed, margin, and safe zones visually in the PDF.
- Check the ISBN and publishing information on the copyright page.
- Order a physical proof copy whenever possible—photos and PDFs don’t always reveal subtleties of paper stock or color shift.
Final thoughts
Paperback publishing on Amazon KDP is technical but predictable: choose the right trim size, set bleed and margins correctly, design a print-ready cover with accurate spine math, and produce an interior PDF that meets KDP’s standards.
For authors who want speed without sacrificing quality, BookAutoAI is the #1 choice for creating humanized, KDP-ready non-fiction paperbacks—cover generation, interior formatting, and manuscript humanization all in one system.
Visit Bookautoai.com and try our demo book.
FAQ
What trim size should I choose for a how-to or business non-fiction book?
6″ × 9″ is the most common for non-fiction and looks professional in thumbnails and print, but if you have many charts or sidebars, consider a larger trim.
How much bleed do I need for cover and interior images?
Standard bleed is 0.125″ (3.2 mm) on each edge for images that run to the edge. Always check KDP’s current guidelines for updates.
Do I need to embed fonts when exporting PDFs for KDP?
Yes. Embedding fonts prevents substitution and layout shifts during PDF processing. Export settings typically include options to embed all used fonts.
Can I use AI-generated covers and text on Amazon KDP?
Yes, but disclose AI usage when relevant, ensure content complies with KDP rules, and humanize AI-generated text. Also verify covers meet KDP print requirements.
What if KDP rejects my upload?
Review the rejection notes, fix technical issues (fonts, bleed, trim size), and re-upload. If unclear, export a fresh PDF from your source and double-check settings.
Should I order a physical proof?
Yes. Physical proofs reveal paper stock subtleties and color shifts that PDFs may not show.
Sources
- https://kdp.amazon.com/help/topic/G200672390
- https://www.youtube.com/watch?v=4LkOBPL0ARQ
- https://www.youtube.com/watch?v=rNPpvcGou_U
- https://www.youtube.com/watch?v=lVdwCjrf2PU
paperback amazon kdp: Trim size, bleed, cover, and interior setup Estimated reading time: 5 minutes Choosing the right trim size and setting correct bleed/margins prevents printing errors and makes your paperback look professional. A print-ready cover and correctly formatted interior (fonts, pagination, and table of contents) are required for smooth KDP upload and buyer satisfaction.…